
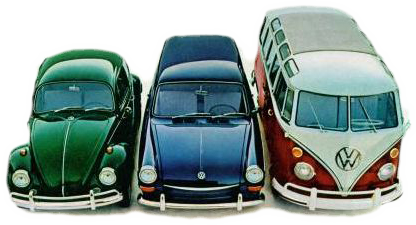
The Schneider Family Website
Volkswagen Stuff
- Details
- Hits: 3043
From time to time the brakes in a VW need to be bled. This can be an easy job or you can do it the hard way which can lead to patchy baldness where you pull your hair out. If you read on, I'll share with you what I have learned over the years about doing the job on the old air-cooled Volkswagens.
I used to have to find a friend to help out. They would get the easy job sitting in the drivers seat pumping the brake pedal while I'd call out the orders, "OK, pump it up. Hold it. Is the pedal down? OK, Pump it up. How does it feel now?" and so on.
After a while, I had come to rely on tools more than friends. Enter the brake bleeder:

Now this little beauty looks like it would do the job quite well but, in reality, is truly just a big waste of money. It's made entirely of the cheapest Chinese materials available and is designed to sell, not to actually work. The first time I went to use it. the e-ring at the back of the plunger shot across my garage never to be seen again and the red hose soon cracked as bad as any I have ever seen...in places, just from being slightly bent.

Then I wasted my money on this unit:

This thing is not at all big enough. The magnet isn't up to the job either and lets go just from the force of the hose bending especially on a cold day when the vinyl hose is stiffer. Also, the magnet is held on (sort of) by the little black thing you can see being pushed into a hole in the cap. Well, the black thing is a little too small or the hole is a little too big because it almost falls off. Both of the above come from a rather well known tool store with the initials HF that sells mostly Chinese, er, stuff.
There are many others available of varying price and quality like these for example:


There, now doesn't that just look so easy and almost even fun?

Just sitting around casually bleeding the brakes with nice clean hands and your favorite shirt on. Yeah, right! If you've ever done this before you know to wear nitrile gloves, grubby clothes and maybe even safety glasses.
So here is where it gets good. I made my own bleeder tool that actually works and costs very little. I used a master cylinder cap, an old tire valve and an o-ring to come up with this:


Now, this works really well and the net cost was zero! It was made entirely of junk I had laying around so I also got to feel good about my recycling effort. Just remember DO NOT use an air compressor. I think you can figure out why. All that's needed is s pump or two from a bicycle pump, then go open up one of the bleeder valves and keep an eye on the reservoirs fluid level. No more need for clumsy gadgets or clumsy helpers.
Ironically, this thing just sits in the 4th drawer up of my tool box now since I discovered the easy way of bleeding the brake system. This may even work on other makes, models and years too. Now days, I just open up all four bleeder valves and go eat dinner. When I come back, I close all the bleeder valves and all is as it should be provided I didn't go out to dinner or take a nap and leave the valves open for so long that the reservoir is completely drained. If you think about it, the difference in elevation between the reservoir and the bleeder valve, the size of the bleeder hole and the viscosity of the brake fluid will all act together to slowly bleed the system if the bleeder valves are left open. The air will naturally evacuate since the valves are intelligently located on the tops of the slave cylinders.
So now you know the secret. Give it a try. What have you got to loose? Just remember to keep an eye on the reservoir fluid level and enjoy the "easy way".
- Details
- Hits: 2779
So, digging through some stuff and found this trophy screw from about 23 years ago and decided to share it with the world
The year was 1988. I had (and still have) a pretty cool white '66 Bug with a slammed front end, 1600 dp, dual K-dogs, an 009, Euro-Tuck header and of corse, a 500 watt stereo. I loved that little car and practically lived in it. It was a $450 cream puff!
On the day I was to leave on a one week vacation to SLC in my trusty bug, the clutch shaft in the transmission broke. I had to do an emergency R&R of the engine just to replace the stinkin T.O. shaft, that at the time, cost about $7.00. With the help of a trusted friend who was going along, the job was done in a couple hours ...except where did that last tin screw disappear to? Oh well. I just dug around in my junk and got another to finish the job.
Off we went on the 500 mile drive to SLC from Reno. The car ran great and the vacation was a blast with side trips through American Fork Canyon, Bridal Veil and Mount Zion National Park and a couple nights camping in the Uintas. The miles probably added up to 2500 or more including the drive home.
The next week was business as usual driving to work and back plus all over town fulfilling my busy social agenda.
That weekend was a drive to Susanville, about 90 miles North of Reno, and around some of the river canyons and back to Reno. We (the Bug and I) another couple hundred miles that week.
Drove to work and back for another week and bla bla bla.
When I wen on my next weekend road trip to Donner Summit I found that missing screw. I was past Truckee heading up Donner Pass when all of a sudden my beautiful Bug lost almost all power. It sounded horrible and my Bugs life flashed before my eyes. I was envisioning spending $200 for another good running 1600 (Ahh, those were the days)!
I towed the car home and began my investigation. The engine turned freely and that was a welcome goo sign. Next, I pulled off the valve cover and rolled the engine over to check the rockers. One had huge slack in it because the valve was not even coming close to closing. With that, I pulled off the corresponding carb and looked down in the port with a flash light and a mirror. What do you suppose I saw? The ding-dong trusted friend had dropped it down the throat of the carburetor (because it sure wasn't me!).
I turned the motor to lift the intake valve, stuck a magnet down in there and pulled out the screw you see here in the picture. I rolled it over a few more times to check the action and all seemed fine. I bolted and baled everything back together, fired it up and PRESTO! It ran just as it always had. I tell you, it's a good thing the stock cams have such minuscule lift that they can't even suck in harmful objects! This screw had to bounce and bang around in there for probably 4000 or5000 miles before it was beat down small enough to get stuck in the valve!
Here is what it looked like along with a brand new one. I don't know what ever happened to the washer. ???

- Details
- Hits: 2738
There's nothing like being able to tune each cylinder individually. Nothing to be afraid of. They just tune and run better.
Think of the firing order - 1432, that's RLLR (Right, Left, Left, Right), or reordered, 4321 that's LLRR. The first puff through the carb gets the fuel/air mixture going and the second doesn't have to start flowing from a dead start. The first puff through the carb will not be the same as the second. Also examine how the throttle plates open: single throats / / vs. \ / on dual throat carbs. Since both carbs are the same, both rotate the same direction. This is true for both single and dual throat carbs however single throats are both mounted with the float bowls toward the front of the car whereas the dual throats turn one around causing both throttle plates to direct the incoming charge toward the intake valves. For single throats this makes them different not only from first to second impulse, but left to right too. This makes the mixture different for all four cylinders. The differences are slight but can be seen on the spark plugs.
Another thing not mentioned yet is that IDA, IDF, DCNF and DRLA (carbs with bearings) all have emultion tubes, air corrector jets, squirter jets, secondary vents, changeable vents and other things that make them much more tunable and generally better at metering fuel...for better or worse. They are harder to understand but stay tuned as well as any other carb. Generally, you are doing the same thing on all four barrels the settings are the same on all. Single throat carbs never really get there, just close.
Most dual throat carbs also have ball bearing supported throttle shafts as opposed to steel on zink common to most single throat carbs. The ball bearings provide for smoother, more accurate throttle positioning as well as reduced wear on the throttle bode, the softer of the two metals. When the throttle body becomes worn. the throttke shafe and plates can move around with undesirable results like uneven positioning, sticking and vacuum leaks to name a few.
If you've ever run dual 2 barrels (not progressives) you surely understand and would never go back.
- Details
- Hits: 2382
Some time back, Speed channel had an "all around performance car" competition that entailed events like 1/8 mile, auto-cross, slalom and a few other categories. The overall winner was a yellow 72 super.
You can do pretty damn good for a fraction of the cost.
The original front end beams had needle bearings on the outers and bakelite on the inners. Someone (Bugpack?) makes delrin bushings. Try to get ones that are a tight fit into the tubes and snug on the arms so the movement happens at the arm, not the tube. Grease them up good before each event so they don't wear and get sloppy again.
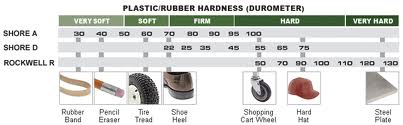
Check the arms for wear on the surfaces they rotate on within the beams. They usually wear on the area where the bakelite bushings were (the inner end). Urethane is, IMHO, not good for that particular application. It is likely about 98 A durometer (durometer or hardness is the measurement of distance a pin with a given surface area will deform the material with a known amount of force).
IOW: they may feel tight by hand but have too much give under the high forces of hard cornering. That's why I recommend delrin bushings. A little wiggle will add up to a lot at the contact patch.
SwayAway makes stiffer torsion leaves for the front but you can modify yours by welding some of them together. Also, lowering the front will help. Adjusters are best; you can also cut-and-turn, but then you are stuck. The top adjuster is for ride and the bottom is for height. Stiffer rear torsions and lowering the back (only slightly, 1 spline) will help too but you have to match them to the fronts.
Upgrade the sway bar on the front and stick a caster shim or two behind the bottom tube so that when you turn, the tire leans into the corner. These are usually used to sorta correct the handling on slammed bugs. To do this, you will need longer bottom bolts.
A kafer brace, urethane spring plate and IRS bushings (I do recommend urethane here), and some sort of down travel limiter (shock straps, welded spacer, etc.) will help tighten up the rear end.
IRS is definitely better. Then you can lower it more and still have good wheel alignment and run a rear sway bar. It's not real expensive, but it is hard to do correctly (welding the top of the bracket) with the body on the pan. The 68 pan is well suited for this type of conversion because it has the straight rear shock tower. The older cars have curved ones that will hit right on the brake line at full compression. If you do it, be sure to use the jigs. The jigs cost $100 but some places will rent them to you (aircooled.net?). It's too easy to screw it up without them.
If you stick with swing axle, your handling will be good but limited and suffer from over steer but a camber compensator will help lots.
Get wide fiberglass fenders and fat tires. The autocrossers in Europe do this with small diameter wheels and tires. Of course, experiment with tires, tire pressure and shocks.
Run a deep sump so you don't suck air and see the idiot light flash or come on steady during hard cornering. This also lowers the CG a bit.
Changing your seats so you sit lower will also help. The driver can easily be 10% of the vehicle weight. Take out any weight up high - radio, wiper motor. Anything you can do to lighten things up will help in both acceleration and handling. Run only 1/4 tank of gas. That gas tank is up kind of high in a bug and it sloshes too.
You can do most this for very little money. The torsion bars, wheels and tires are the spendiest part.
If you do all this stuff you will be in the front half of the pack.
Lower, stiffer, tighter and lighter.
- Details
- Hits: 56938
Benefits of a more aerodynamic vehicle come in the forms of higher speeds, lower ETs and greater stability (tumbling or scraping the wall is bad).
Well, you have a few things working against you in a Bug. First an worst off, the thing is shaped more or less like an air foil...this means lift at higher air speeds. Not optimal. You will feel as a drifty front end (made worse by loose front end parts) and a lifting of the rear when decelerating at high speeds. Another is the flat wind shield but at least only the top half of it really catches the air. Bad thing is the bottom half of the windshield and the part of the hood closest to the the windshield create a low pressure zone and lift on the lightest end of the car.
To counteract the driftiness, guys lower their cars, get the one piece front end with the spoiler that also pushes the air out past the back of the front fenders and cut holes in the backs of all fenders. The spoiler also helps to form a low pressure under the car, the benefits of which are obvious.
Also, the bug front end is more sloped (in the beneficial direction) than a Baja front end to reduce drag. Lowering also reduces drag by reducing the effective frontal area of the vehicle (the car drags the air under the car along with it effectively increasing the frontal area). In a car the size of a Bug, this can mean a reduction of couple square feet of frontal area by lowering 4"-5" by changing tires and suspension. That is very significant and even more so at higher speeds. Lowered vehicles are generally more stable too. It also looks cool.
At the back end, you can put a small spoiler that attaches to the louvers under the back window. The Hot VWs series "Milage Motor" also showed an increase in fuel mileage when using one of these. Increased mileage means less wind drag and potentially lower E.T.s and a higher top speed in the quarter. The really fast cars have a big fabricated engine cover with a big wing on top. Not only is this a nice place to put a turbo, but also helps to smooth out the air flow, disrupt the air foil effect, and further decrease the air pressure under the car. It also looks cool. Another trick is to limit the rear wheel down-travel so when you lift off the throttle at the fast end of the track, the back end stays down and the rear wheels don't tuck (when the rear wheels tuck it also changes the rear wheel toe alignment). This is commonly done with straps or a piece of metal welded on the down-travel stop of the torsion housing.
All of these effects get amplified at higher speeds and are further exaggerated by the fact that wind drag and air foil effects are logarithmic.
That's the basics.